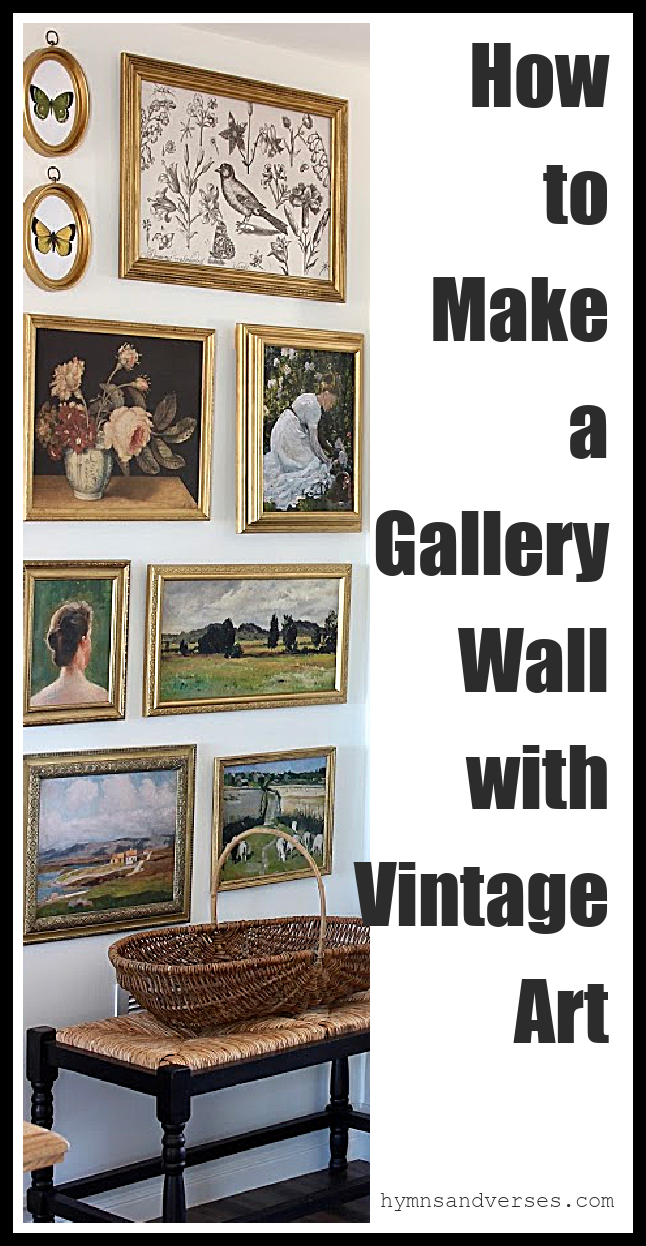
Today I’m sharing all of the tips and tricks I used to create a vintage art gallery wall without breaking the bank! If the idea of a gallery wall has intimidated you in the past, then this tutorial on how to make a gallery wall will give you the confidence to get started!
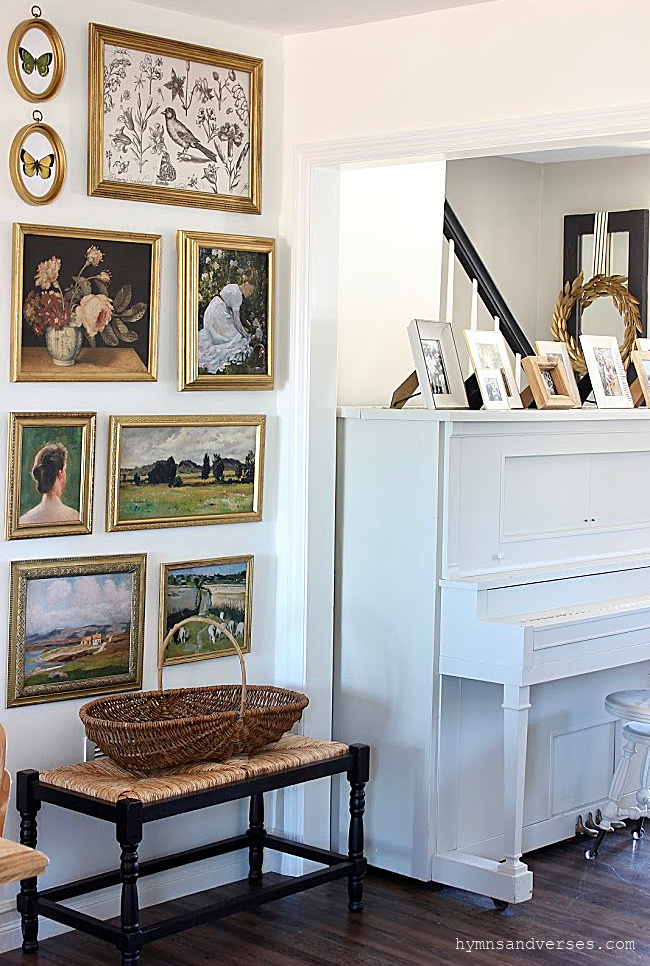
But first, thank you all for your sweet comments on my 2021 Spring Home Tour. I really appreciate it when you take time to leave me a comment or question! Many of you seemed to like the gallery wall leading into my kitchen/dining room areas. So, it seemed like a good time to share all the details of putting that gallery wall together!

where to find gallery wall frames
I found all of the frames I used in this gallery wall at the local Goodwill! Each frame was 2.99 or less! Here are a couple of tips for choosing gallery wall frames:
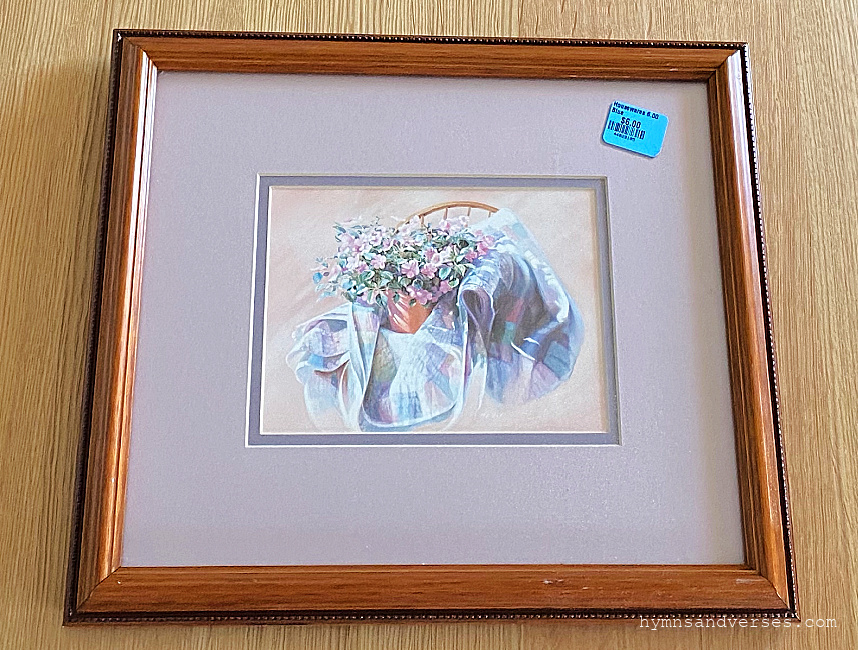
First, all of the frames I purchased at the thrift store had art in them. That’s okay because you’ll just remove the existing, dated art! Some of the art is really bad, but look past what’s in the frame and focus only on the frame itself! Now, if you’re lucky and find a framed vintage painting that you like, hurray! But, don’t get your hopes up when shopping at a thrift store! This is a good example of the kind of art you’re likely to find in a thrift store. The tag on this frame is $6, but blue stickers were 50% off that day! So, I paid $3 for this pretty wood frame!

Choose frames in a variety of sizes and shapes. If your gallery wall space is going to be large, then choose larger frames. If your doing a gallery wall is in a smaller space, then choose more medium sized frames with one larger frame.
Mix it up by using both chunkier frames with thin edge frames.
Wood frames work best, but I picked up one really detailed frame that was plastic and it also worked well. And, be sure to choose some frames with decorative details.
HOW TO UPDATE THRIFT STORE FRAMES FOR YOUR GALLERY WALL
First, I removed all of the old art from each of the frames that I purchased. I also removed the glass. But, that is just a personal preference of mine. Since the vintage artwork in my gallery wall were images of original paintings, I chose to remove the glass from my frames. Think about it this way, most original oil paintings don’t have glass over them.
If the frame is dirty, give it a good cleaning. Once the frames are clean, you can give them a makeover! I wanted all of my frames to look antique and preferred a worn, gold finish. So, I used “Gold Leaf” Rub ‘n Buff” on all of the frames to give them a cohesive look. Again, doing them all the same color/shade is just a personal preference. I’ve seen beautiful gallery walls with a variety of frames – some black, some gold, some wood, some with glass, some without, some with a mat and some without, etc. Do what you like best!
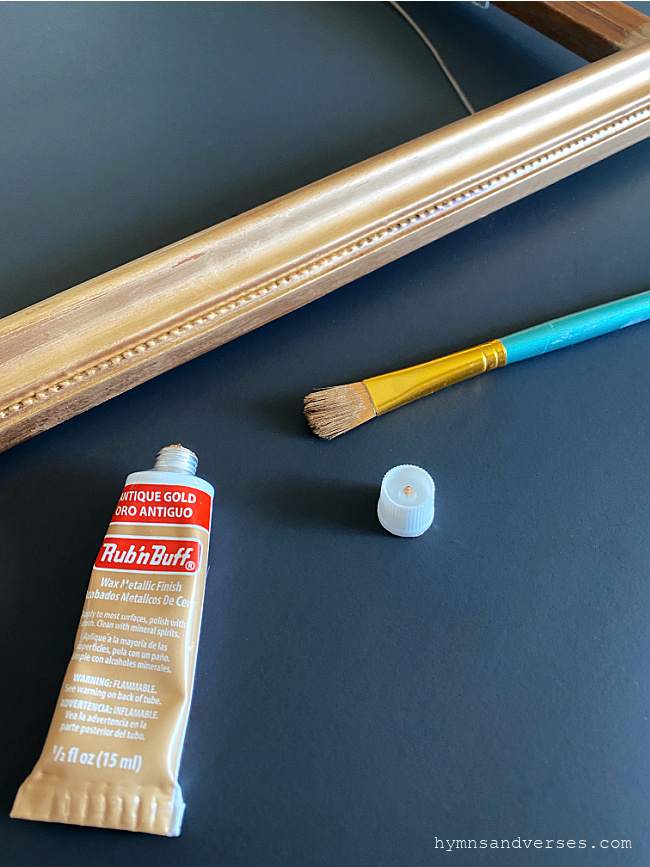

I used a craft paintbrush to apply the Rub ‘n Buff. I set up a work table in our family room and worked on this when we watched TV in the evening. And, it’s a quick process! Rub ‘n Buff isn’t paint. It’s almost like a thick wax that adheres to the surface and drys. It’s not sparkly or too shiny either. I think it really gives a nice, vintage finish. The photo above shows “Antique Gold” Rub ‘n Buff, but I used “Gold Leaf” on my gallery wall frames.
HOW TO CHOOSE PLACEMENT FOR THE GALLERY WALL FRAMES
Here’s a great tip for laying out the gallery wall. First, measure your wall space with a tape measure. Then, use masking tape or painter’s tape to recreate this wall space on the floor. Now, start experimenting with frame layouts using the empty frames. Take your time until you have the placement that looks good to you. When I did this, I found that I needed a few more frames to fill my space.
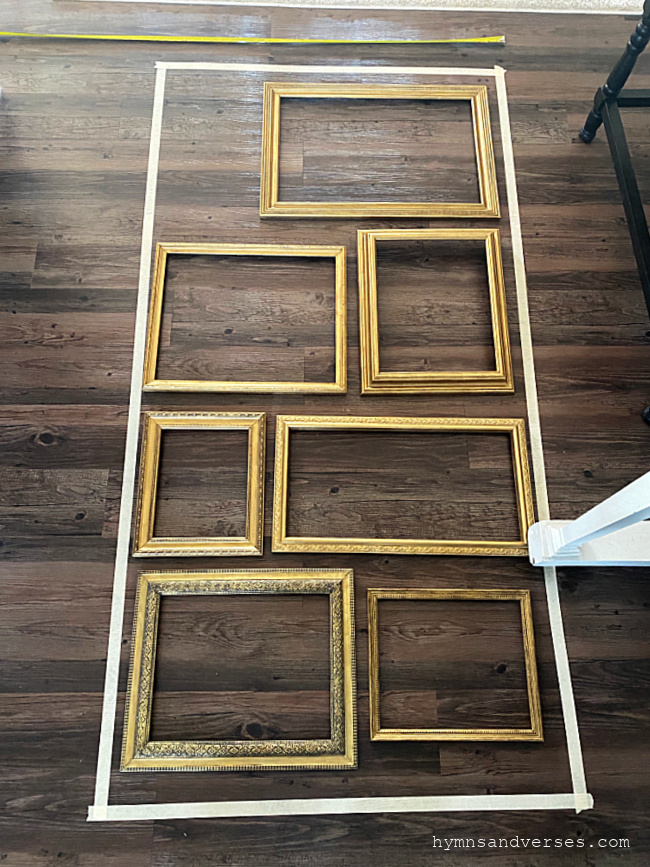
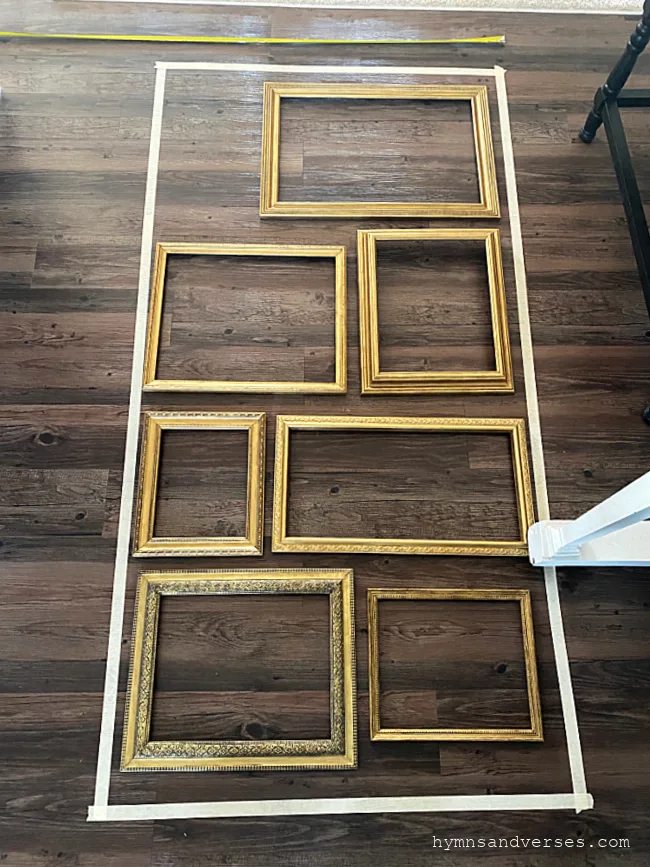
So, back to the thrift store I went and picked up two more frames that were in the size I needed to fill those spaces. Once you have the placement of your frames figured out, sketch the design on a piece of paper.

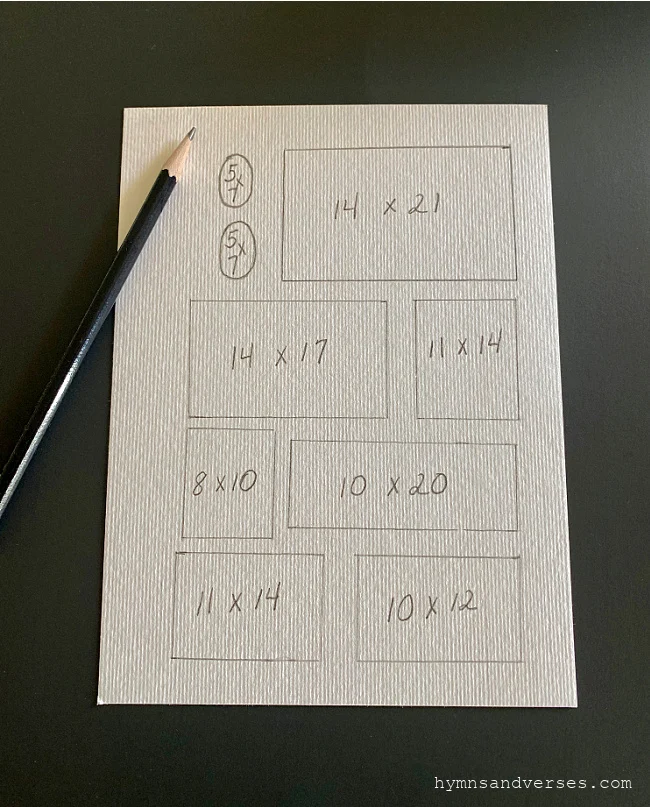
On the sketched layout be sure to include the size of each frame on the sketch (you will need this later when sizing your art). Then, you can remove the tape from the floor and pick up your frames so they don’t get stepped on!
how to choose art for your gallery wall
You may think this step is way out of order and wonder why not choose the art first? I did it this way because I thought it was easier to choose artwork to fit the frames, rather than trying to find frames for the art and then it not working out in the overall layout. Does that make sense? I hope so! With the frame layout sketch by your side, begin looking for artwork that would look good in those frames. Don’t worry about sizing just yet. I’ll show you how to do that in a bit. If the frame is being hung vertically (or portrait), look for art that is vertical. If the frame is being hung horizontally (or landscape), then look for art that is horizontal.
online sources for vintage art
When considering vintage art, anything that is over 100 years old is considered royalty free or in the public domain. Meaning, it’s not copyright protected and can be reproduced. There are two sources to purchase digital downloads of vintage artwork that I’ve used: BFF Print Shop and Museum Quality Prints. The downloads range from $15 to $20 per download. And, both places do offer sales periodically. Using both of these sites, you can find beautiful vintage art that you can use for a gallery wall or just one print.
Now I’m going to share a few sources where you can find royalty free vintage art for FREE! It will take you some time to search, but for me, that’s part of the fun! The first online site for public domain art is Rawpixel. I’ve gotten some amazing vintage art prints at Rawpixel. Even some of the vintage botanical art prints that I’ve shared with my email subscribers came from Rawpixel. Just make sure you click on Public Domain when searching there and you can download 20 prints per day!
Here are a few more FREE online sources that I used: Artvee, Rijksmuseum and Google Art Project.
So, searching does take time. But, I really loved finding just the perfect pieces! I also loved discovering an artist and seeing all of the different painting styles. If I would find one piece of art I liked, I would search by that artist’s name to see more of their work!


Sources for Art in Hymns and Verses Spring Gallery Wall
I thought I’d share all the sources for the art I found for my gallery wall with you!
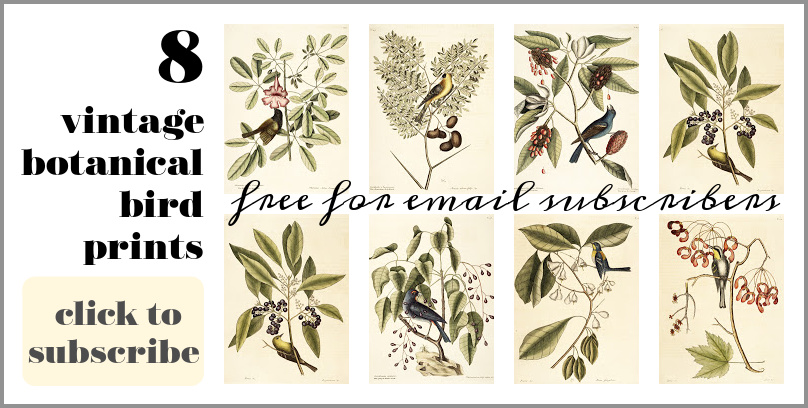
Green Moth in my FREE Printable Library
Chartreuse Moth in my FREE Printable Library
1. Spring Engraving by Nicolaes de Bruyn (possibly), 1594
2. Flowers in a Delft Jar by Alexander Marshal, 1663
3. Gathering Flowers by Charles Wellington Furse, 1868-1904
.jpg)
4. Head Study by Torsten Wasastjerna, 1892
5. Landscape from Tuulos by Hjalmar Munsterhjelm, 1877
6. Landskap by Kitty Lange Kielland, 1889
7. Landscape with Sheep by Akseli Gallen-Kallela, 1884
I know this is a long post and it would be even longer if I went into the topics of sizing and printing the art. For part two, “How to Resize Public Domain Art to Fit Any Frame” click HERE.


Aimee Jeffcoat
Wednesday 16th of November 2022
Wow, the tape on the floor is genius! Thank you for all of the tips and sharing.
Jessi
Thursday 24th of February 2022
Love love love this! Question though- after you do the digital download how/where do you print them to? Especially the bigger prints? I'm assuming you can't use a standard printer, right?
Doreen Cagno
Thursday 24th of February 2022
Hi, Jessi. So glad you like it! I size mine in Photoshop and then have Staples or OfficeMax print as a poster in a matte finish. Here's the link to the post where I explain all the details: https://hymnsandverses.com/how-to-resize-public-domain-art-to-fit-any-frame/.
Doreen
LyndaKay
Tuesday 13th of April 2021
Thank you for including suggestions for royalty-free vintage art sites. Your tips for painting the frames with the Rub n Buff and laying out tape on the floor to arrange the frames were gems!
Carole
Tuesday 23rd of March 2021
I really like this post! Thank you so much for sharing everything in it! I have several gallery walls in my home using plates and many different objects including old paintings but your choice of landscapes is just what I have wanted and never knew how to find them. Thank you so much and I look forward to the next post.
Peggy
Tuesday 23rd of March 2021
Love it!! I especially like the oval 5x7s you when back for as "fill-ins". Turned out great!