Today I’m going to share the next step for creating a gallery wall with vintage, public domain art! If you missed Part 1, How to Make a Gallery Wall with Vintage Art, click HERE.
In Part One, I shared sources for vintage, public domain art that can be found for free or at a small cost on the internet. Then, I showed you what I do to create a gallery wall layout. And, finally, where to find beautiful frames for your gallery wall, but on a budget! This post will show you how to size and print your downloaded, public domain art for the frames in your gallery wall layout!


HOW TO DIGITALLY Size PUBLIC DOMAIN Art to Fit A Frame
First things first. When you download a piece of public domain art from the internet, always download the largest file size (if there is that option). A higher number of pixels will give your a higher quality image. Once you download and save the image on your computer, the next step is to size the art for your frame. Measure the inside of the frame that you have for that piece of art. This frame measures 10″ x 20″, which is not a common size. I have a print that is an elongated landscape, but now need to make sure it is 10″ x 20″ so it will fit into my frame.


I use Photoshop to size downloadable art to a specific size. But, Photoshop Creative Cloud is a paid service. So, I would recommend you use Canva, which is Free! So, you will want to set up a free account with Canva.
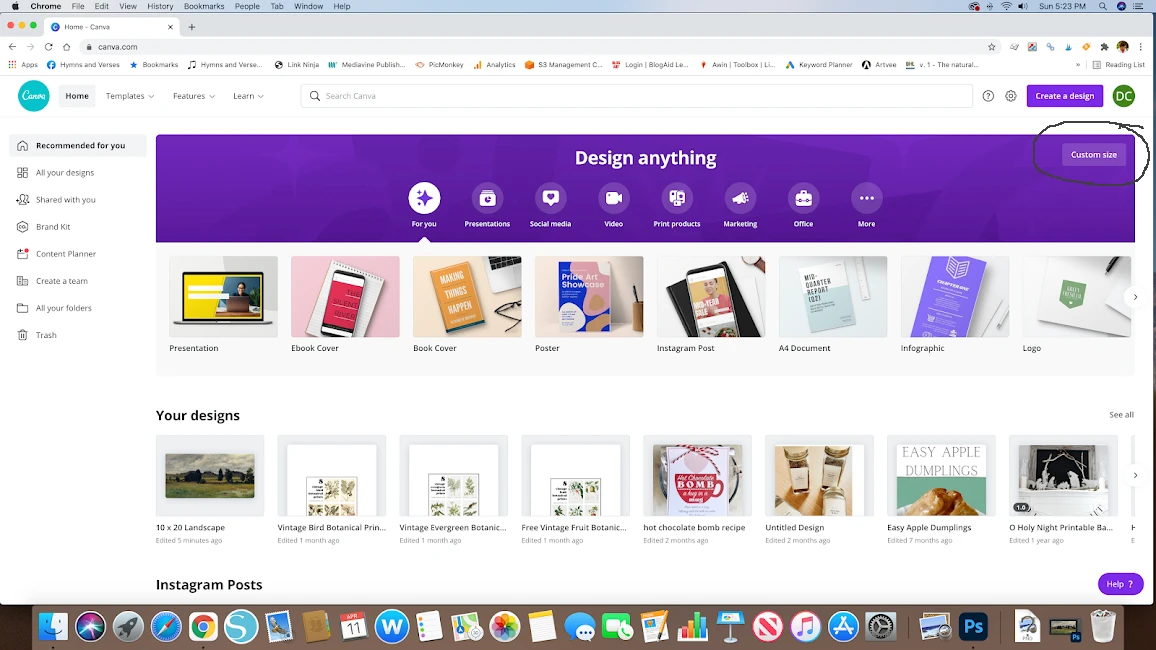
SIZING IN CANVA STEP 1
Once your Canva account is set up, you will see a screen like the one below. Click where it says Custom Size at the upper right hand corner of the dark purple bar that says “Design Anything”.

STEP 2
Next, you will see this screen where you will enter the dimensions for your design. Change from pixels to inches as shown in the image below and enter the appropriate dimensions needed for your art. Since my frame is 10″ x 20″, that is what I entered here. Then, click on the button below “Create New Design”.


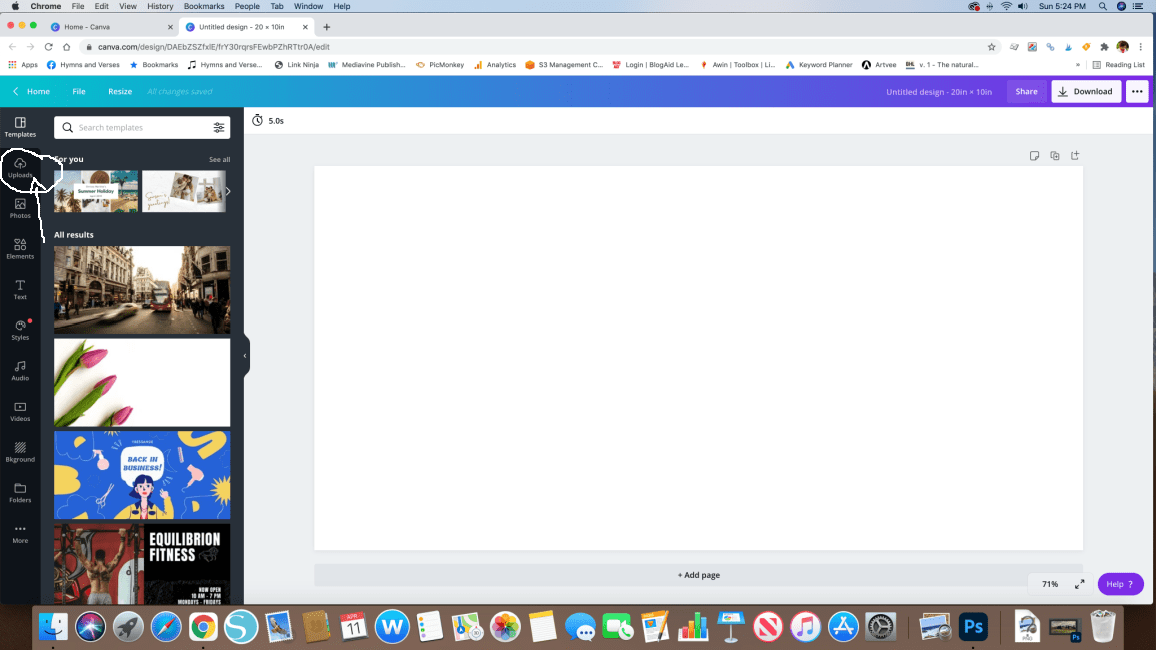
STEP 3
The screen that appears will show a white design space that is sized to what you entered above. Mine is 10″ x 20″. Now, you want to add your public domain art to this 10″ x 20″ design space. To do this, click on the UPLOAD button in the upper left hand side of the screen, as shown below.

STEP 4
When you click that button, you will see the screen below. Click on the purple button “UPLOAD MEDIA”


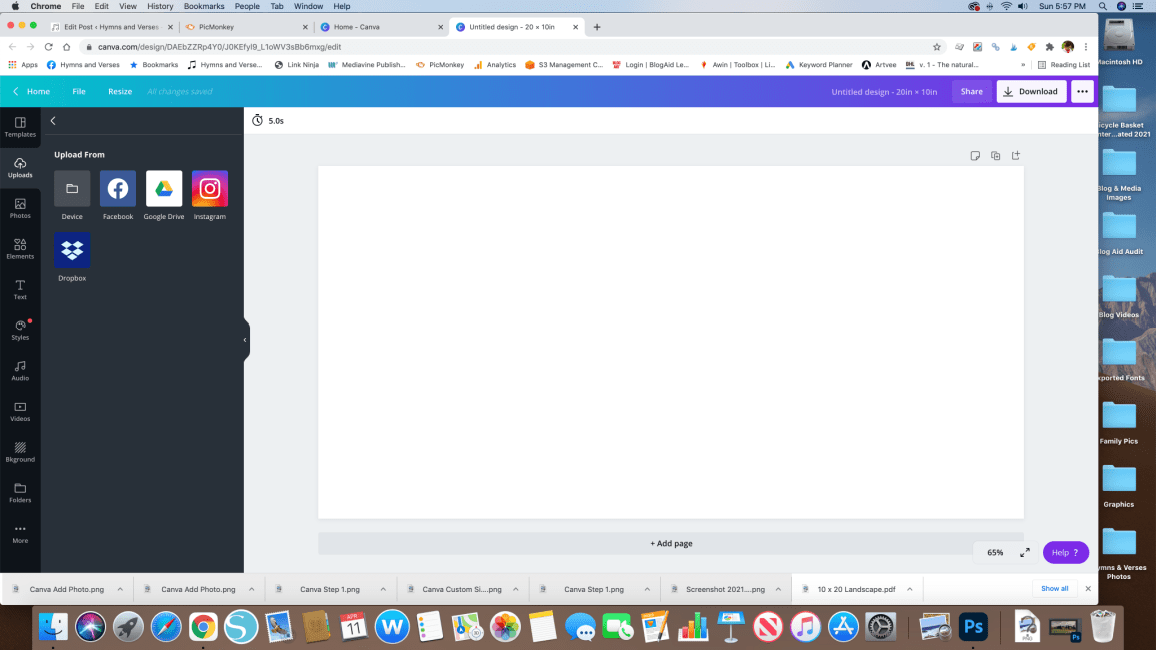
STEP 5
The next screen will show options of where to locate your image, where it’s stored. The options are DEVICE, FACEBOOK, GOOGLE DRIVE, INSTAGRAM, OR DROPBOX. My downloaded image is on my computer, so I click on DEVICE.

STEP 6
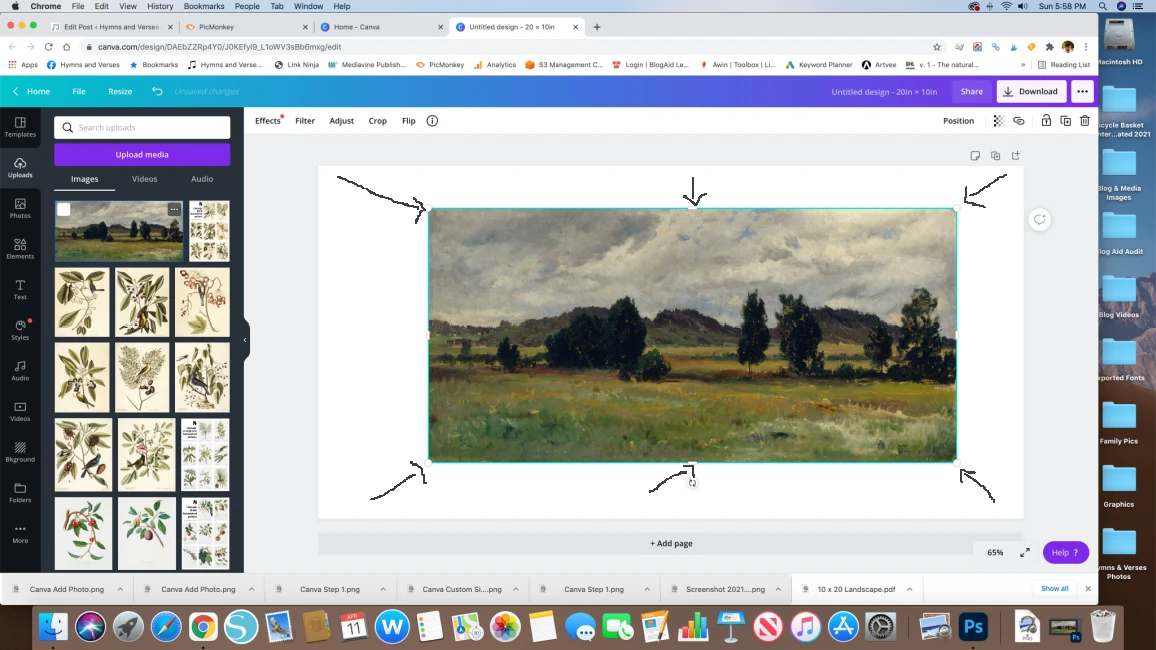
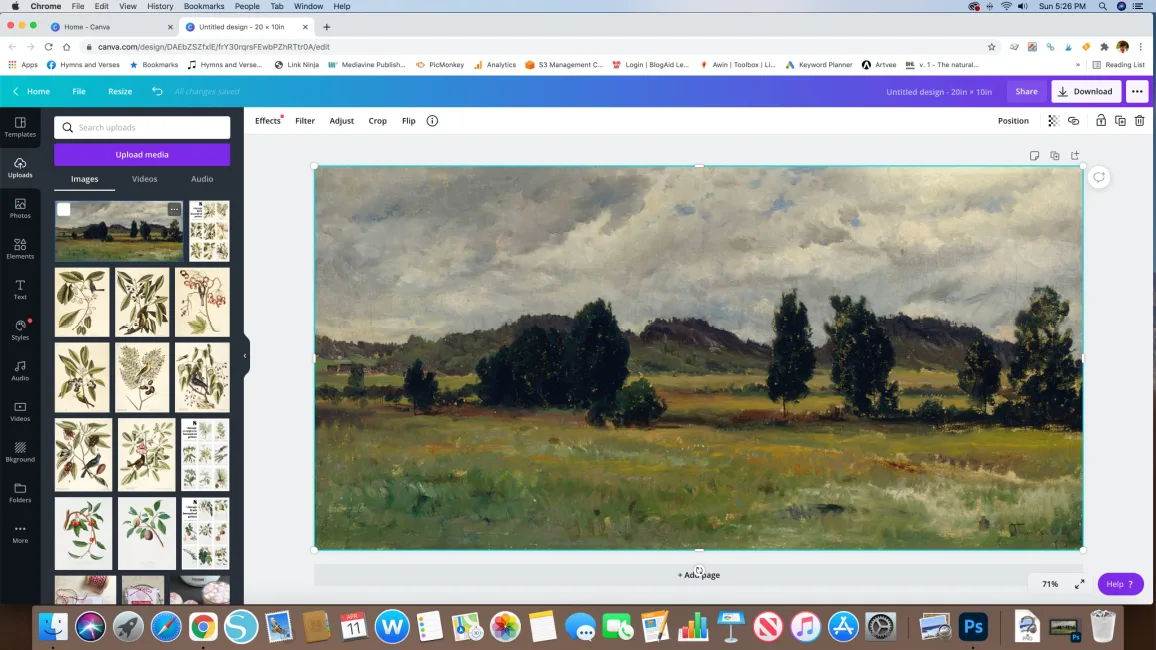
Locate the public domain art that you want to size and click on it. Then you will be prompted to upload that file. Once the file is uploaded, move it into the design space you created. So, in the photo below, you can see that that I moved my landscape image into the 10″ x 20″ design space, but the image is too small. I need the image to FILL the design space. You’ll also see that the image is outlined in blue and has small circles in each corner and small dashes in all the center points. Click and hold on any of these spots to enlarge the image until it fits to the size of your design space.

STEP 7
As you can see below, my image is now the size of my 10″ x 20″ design space.

STEP 8
Be sure to name your image. I named this landscape “10 x 20 Landscape”. Now, you can click the DOWNLOAD button in the upper right hand corner to download your public domain art that is sized perfectly for your frame. When you click on the Download Button, you will be given options of file formats (PNG, JPG, or PDF). PNG is best for a higher quality image.
I know this seems like a lot, but I hope that by breaking down these steps you can follow this tutorial to resize your art as needed for printing to a specific size.
PRINTING DOWNLOADED PUBLIC DOMAIN ART
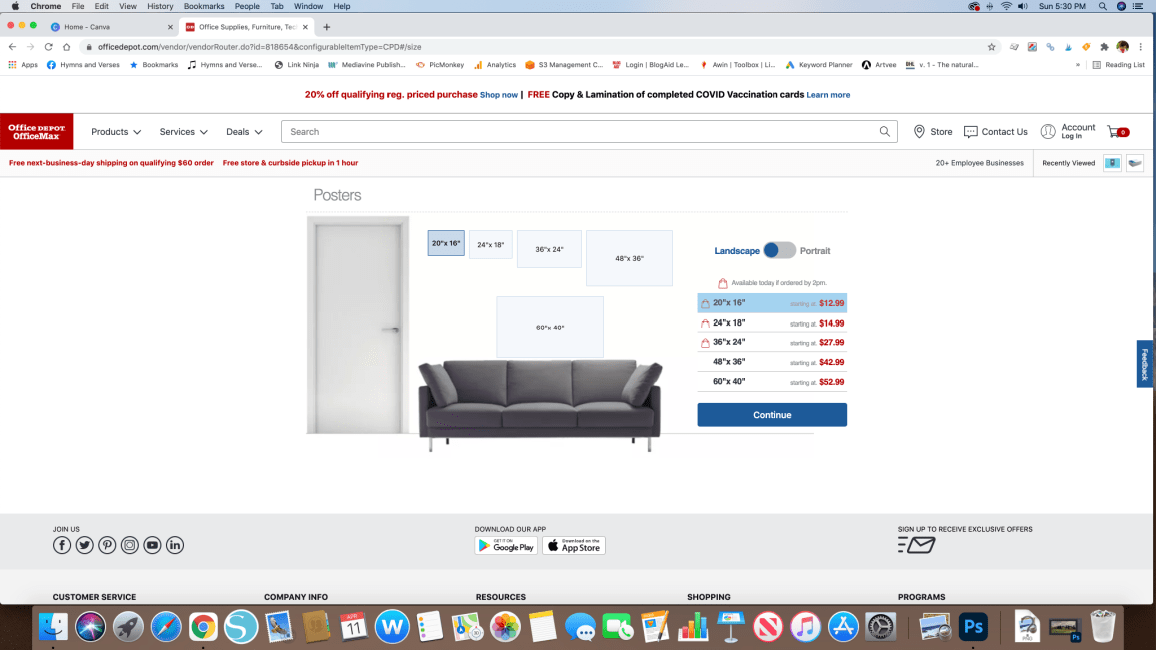
So, now you have your piece of art sized to fit your frame! Now, you just need to have it printed. I’ve had the best luck with Staples or OfficeMax for my printing. And, tend to favor OfficeMax. Regular document prints are very inexpensive, all under $1 each per full color print. There is Letter 8.5″ x 11″, Legal 8.5″ x 14″, and Ledger 11″ x 17″. Because I don’t keep the glass in my frames and I like a matte finish, I have my art printed on cardstock. If your art is larger than 11″ x 17″, you will need to order a poster print. For my poster prints, I have them printed on their 55 lb. Matte Paper. But, there is a less expensive option of 24 lb. Bond Paper. The 24 lb. Bond Paper is more flimsy and is what they use for Blueprints.
OFFICE MAX POSTER SIZES AND PRICES

Once my art has been printed, I mount each piece on foam core board that I buy at The Dollar Tree for $1 each. I use spray adhesive to attach each print to the foam core board and then cut it out using an Exacto knife with a straight edge. If you have frames that still have glass, you can skip this step completely and just put your print into the frame.
PRINTING TIP
I always save my public domain art images that have been sized with a name that has the exact size in it. So, when I saved the landscape in my example, I saved it as 10 x 20 landscape.png. If you save your images like this, it’s easier to explain to the printer that you NEED your finished print to be THAT EXACT SIZE (without any white border). If they add a white border to your image, then it throws off the sizing! I find it easier to go to OfficeMax (or wherever I’m having this kind of printing done) in person with my files on a flash drive. That way I can be there when they open up my files and answer any questions they have. Otherwise, you may arrive to pick up your printed art and find it to be the wrong size!
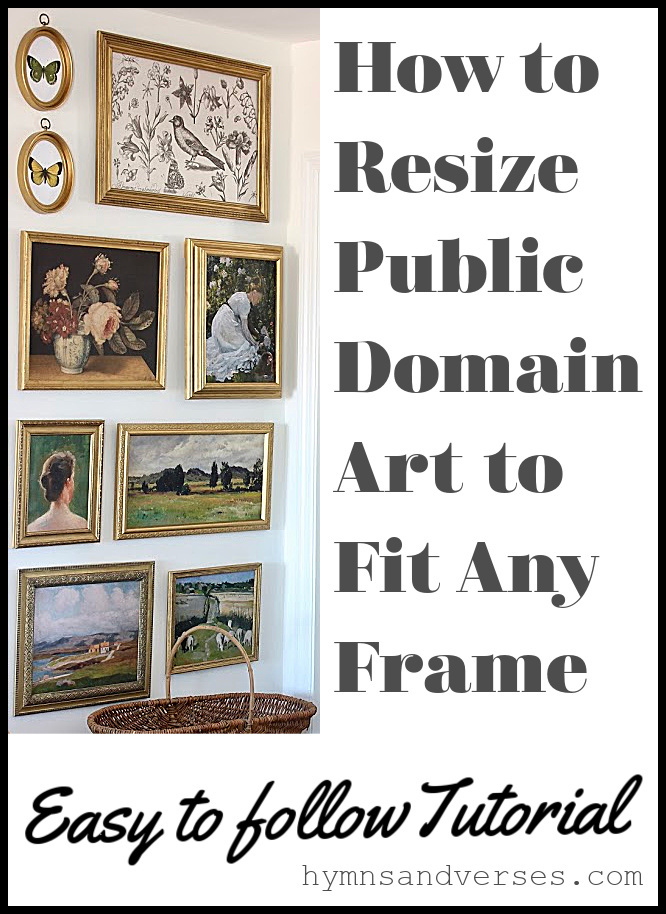

This has been a rather complicated post. And, it’s definitely not the fun kind of post where I just show pretty pictures! But, since I’ve been blogging and changing up my rooms with inexpensive, downloadable art, I’ve learned a lot by trial and error. And, there have been a lot of errors over the years! But, this method has been working like a charm for getting prints the exact size I need for the frames that I have! And, I hope that this tutorial helps when you need to size and print public domain art! And, if you missed Part 1 of this Series, How to Make a Gallery Wall with Vintage Art, Click HERE.

Aimee Jeffcoat
Wednesday 16th of November 2022
I just found your blog and you have already helped me tremendously! Thank you for the 'detailed; how to' you have made my wall gallery process so much easier and doable. Thanks again!
Rachael
Friday 30th of September 2022
I guess I’m still a little confused. How do you get it printed that size if neither store offers a print size of 10x20. I don’t see an option to customize the size at either store.
Doreen Cagno
Wednesday 5th of October 2022
Hi, Rachael
Size the art to 10 x 20. Then, let's say your local store can do a 12 x 24 size print. I would then create a new blank image in photoshop that is 12 x 24. Then, embed or add the 10 x 20 to that. So, the whole sheet is 12 x 24, but the actual image size is 10 x 20. Does that make sense. Or, you could just save your 10 x 20 to a drive and take it to the print shop. Just let them know you need the print to be 10 x 20.
I hope this helps!
Doreen
Payton
Saturday 23rd of July 2022
This is so helpful and exactly what I have had on my mind recently. I’m wondering if you have ever had anything printed on canvas? If so, do you have any recommendations for doing that?
Doreen Cagno
Thursday 28th of July 2022
Hi, Payton. No, I haven't had any prints done on canvas.
Sherrie
Tuesday 26th of April 2022
This is so well explained, which is no easy task. Thank you for all the detail and screen shots, I can't imagine all the time it took to do this so well. Thank you for sharing!
Doreen Cagno
Thursday 28th of April 2022
Thanks so much, Sherrie!
LyndaKay
Tuesday 13th of April 2021
You explained this process very well and included so many great tips! Thank you so much.